Groundplan

Here is an example of a groundplan that you might receive from a scenic designer. You also might get a groundplan from the venue without the set design included. We'll use this theatre and this simple set to go through the exercise of building a light plot.
The first step is to identify the permanent hanging positions that exist in the theatre. In this example we see:
The first step is to identify the permanent hanging positions that exist in the theatre. In this example we see:
- 1-ELECTRIC - 4-ELECTRIC: 4 battens over the stage that have been designated as electrics.
- APRON- 1 batten over the forestage
- 1-CATWALK - 2-CATWALK- 2 hanging positions Front of House over the audience
- 1-BOX - 2-BOX- 2 'box boom' positions on each side of the house. These are ladders or vertical pipes attached to the side house of the auditorium.
- BALCONY RAIL- Though this theatre does not have a balcony, this low angle position attached to the back wall of the auditorium is described with this traditional title.
Center Line Section

The Center Line section is a drawing that essentially saws the whole theatre in half along the center line. This drawing is also an important one in the plotting process.
This drawing gives you more information about where the hanging positions are in relation to the stage. The groundplan tells you the 'x and y' positions, but because it is a 'flattened' view, it does not illustrate the 'z' position, or how far off the ground the hanging positions are.
Notice that each of the hanging positions denoted on the groundplan are also included here. You can cross-reference between the two 2D drawings and construct a 3D model of the space in your mind.
Focus Points
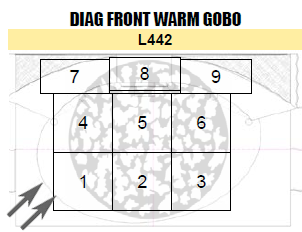
Remember the magic sheet grids that we made? This is where they come into play. As a reminder, for area light, we decided on a 4-point lighting system, 2 diagonal front lights, and 2 high side lights. For the area light systems, we want to break the stage up into 9 control areas, and they were noted on the magic sheet (very cleanly) like this:
The main floor of the stage is roughly 6 control areas, in a 3-wide x 2 deep grid pattern, and each of the 3 raised areas upstage can be controlled separately.
When we start to look at how the set is laid out, we need to make some more specific decisions about how those areas actually look, and it gets a little messier.

To create these areas, I simply start drawing out 3 roughly equal areas across the front of the stage. The proscenium opening is 26' across, and the full width of the scenic area is slightly less than that. We know that 8' to 10' areas are usually OK, so dividing 25' or 26' into 3 sections seems appropriate. Please note that this is a pretty small stage- if you are working on a stage that is 40' or 50' wide, in most cases, you will need to divide into more areas. Remember that you will usually use an odd number of 'columns', so that you have the ability to highlight an actor standing center stage.
There are some spots where we overlap some areas. I know from watching rehearsals that area 3 needs to extend to the DS edge of the SL platform, so that area is stretched a little further upstage than is area 1.
Areas 4 and 6 have turned out to be really small, and as I think back on the rehearsals, I can question at this point whether I really need those zones of control, or if I can stretch the current Area 5 across that whole section. For now, I'll leave it as is, but maybe I'll keep that in my back pocket for later if I need to fit the rig into a too-small inventory.
