 Example of a magic sheet for a small show
Once you have defined a list of your systems and specials, and determined how you're likely to break up your stage into zones of control, you're ready to start developing your magic sheet.
A Magic Sheet is the lighting designer's best friend. This is a graphical display of all of the lighting systems and specials used in a given production. The magic sheet includes channel numbers, color, direction and focus information.
This is all of the same information that will eventually be included on the light plot and the paperwork, but the magic sheet is typically collected all on the same page for quick reference during cueing. It becomes a valuable 'cheat sheet' for the designer to quickly find which channel performs which action. As light plots get bigger and bigger it becomes difficult for the designer to keep all of the different lights straight in the mind. Having a good magic sheet next to you is an extremely valuable tool for efficiency.
A note on process here: Many designers will create their magic sheet at the end of the process (after the light plot is created) as a tool to use during tech. While this is a technique that works for many, and may work well for you as you develop your own process, I include the magic sheet generation at this point in the process because I like to use it as a tool to help me make choices about the design.
My philosophy behind generating the tools in this order is the fundamental difference in how we think about the Magic Sheet versus the Light Plot:
Now in reality, once you gain more and more experience as a lighting designer, you wind up thinking about both steps simultaneously- "I need the light to do this, therefore I can hang it here to make that possible", but as a beginner, I strongly recommend that you consider 'what the light does' and 'where the light hangs' as two separate concepts.
A Magic Sheet is the lighting designer's best friend. This is a graphical display of all of the lighting systems and specials used in a given production. The magic sheet includes channel numbers, color, direction and focus information.
This is all of the same information that will eventually be included on the light plot and the paperwork, but the magic sheet is typically collected all on the same page for quick reference during cueing. It becomes a valuable 'cheat sheet' for the designer to quickly find which channel performs which action. As light plots get bigger and bigger it becomes difficult for the designer to keep all of the different lights straight in the mind. Having a good magic sheet next to you is an extremely valuable tool for efficiency.
A note on process here: Many designers will create their magic sheet at the end of the process (after the light plot is created) as a tool to use during tech. While this is a technique that works for many, and may work well for you as you develop your own process, I include the magic sheet generation at this point in the process because I like to use it as a tool to help me make choices about the design.
My philosophy behind generating the tools in this order is the fundamental difference in how we think about the Magic Sheet versus the Light Plot:
- The Light Plot shows us where each beam of light STARTS in the theatre
- The Magic Sheet shows us where each beam of light LANDS on the stage
Now in reality, once you gain more and more experience as a lighting designer, you wind up thinking about both steps simultaneously- "I need the light to do this, therefore I can hang it here to make that possible", but as a beginner, I strongly recommend that you consider 'what the light does' and 'where the light hangs' as two separate concepts.
Creating the preliminary magic sheet
At this point, you're ready to begin developing a preliminary magic sheet. Print out a groundplan for each of the systems that you put on your list. Label the groundplan with a direction, color, and purpose. Then put a box for each zone of control. Below is an example of how I might lay out two of the systems from the above example, with some of the notes that I might include on the preliminary magic sheet. If you are completing this lighting design, you would have a section for each of the systems, and as many sections for specials as you need to make it clear.
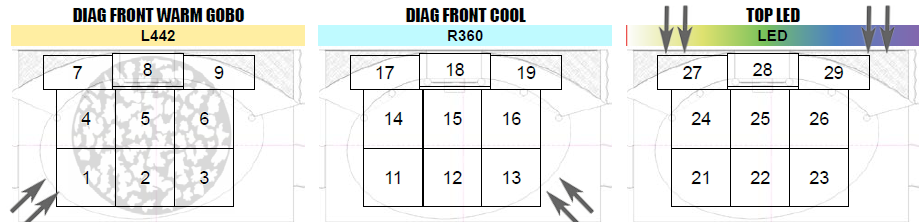
The two systems: Diag Front Warm and Top Blue have two different layouts on this stage- the Area system has 9 areas so that I have a little more control over this system. The Environmental Blue only has 6 larger areas, because it will more typically be used as a full stage wash, rather than needing pinpoint control over each square foot of the stage. The circles in these two images touch, suggesting that when all the lights of the system are on, it creates an even wash across the stage, without dark spots in between. (NOTE- at this point in the process, if it doesn't get too sloppy, you might be able to put more than one system in each little section. For example, I might include my Cool Diag Front system on the same drawing as the Warm Diag Front, since these two systems will be using exactly the same areas. Don't do many more than 2 or 3 though. It gets really messy really quickly.)
The third image is a preliminary thought about the use of specials. We have three tight specials on the upstage platform so that I can isolate or highlight characters in these spots. Also there is a special for a couch that appears at some moment, and two areas off the edge of the playing space- one for an 'act 2 monologue', and the other for the narrator. Each of these areas will get two fixtures- a front light and a top light. The isolated shapes here suggest that when these specials are on, they do NOT work as a system, and have dark areas between them.
I have included arrows that suggest direction for each of the systems and specials. On the area light squares I have included some color and gobo notes- you don't necessarily need to choose specific colors here, but having some sense of 'what kind of blue' you're looking for is a good reminder.


Once you have a block for each system and an idea of what kind of control you need over the zones, it's time to start assigning channel numbers to your fixtures. You will eventually find your own preferred patterns to number your fixtures. I tend to start with the system that is going to be the most important system for visibility and start with channel #1. In a play, channel 1 is usually a front light of some sort. If I'm doing a dance show, the shinbusters become the first system.
An organized approach to numbering your fixtures will help you to remember the channel numbers later, and will result in a quicker programming process when you're writing cues. Start from downstage right or left, and number the fixtures in each system sequentially. I say right OR left, because different designers prefer to number their fixtures differently. I prefer #1 to be downstage right, so that I'm counting from left to right when I'm sitting at the tech table. But there are lots of designers out there that start #1 downstage left, and count sequentially from stage right to stage left. There is no correct or wrong way to do it as long as you're consistent.
The next numbering tip I have for you is that you can (and probably should) skip numbers so that your systems make logical sense. In the image above, the last fixture in the system is #9. In most cases, when I start numbering the next system, I will skip #10 and go right to #11 for the next fixture. This way, the downstage right area is always going to end in -1. Channel 1, 11, 21, 31, 41, will always be down right.
I also have a tendency to organize groups of systems logically into my whole list. 0-100 is often reserved for my Area Light systems. Environmental systems go in the 101-200 range, while specials might go into 201-300. This varies from show to show depending on the needs of the plot, but most shows have some kind of organization like that.
I like to reserve my 100, 200, 300, 400 for really special things. These are sometimes house lights, foggers or hazers, or special fixtures like blacklights or strobes. If I'm doing a musical, the conductor special usually ends in -00.
I like to reserve my 100, 200, 300, 400 for really special things. These are sometimes house lights, foggers or hazers, or special fixtures like blacklights or strobes. If I'm doing a musical, the conductor special usually ends in -00.
Building the final magic sheet
Depending on your process, this is a step that you can do right now, or later on after the light plot is finished. Some of the design-based steps should be done now before you go into the process of drawing the light plot (i.e. assigning channel numbers), but these are steps that you can definitely do on your preliminary sheet. 'Making the magic sheet pretty' can definitely be pushed a bit later, especially if you are coming up against your deadlines for submitting your light plot and paperwork to the shop.
There are dozens of different ways to lay out a magic sheet, and you'll eventually find a style that works for you. Likewise, there are many tools that you can use to create your magic sheet. Some examples:
There are dozens of different ways to lay out a magic sheet, and you'll eventually find a style that works for you. Likewise, there are many tools that you can use to create your magic sheet. Some examples:
- If you're creating your light plot in a CAD program such as Vectorworks, AutoCAD, or DraftyApp, you can create your magic sheet right there.
- Standard 'Office'-type tools can work too. I recommend that you use PowerPoint, Keynote, or Google Slides (or similar) rather than a Word Processor, as it's much easier to move text boxes and graphics around to get them where you need them.
- Desktop Publishing software is probably the most powerful tool here - the learning curve is maybe a little steep, but they tend to turn out nicer stuff. Examples are Adobe InDesign or Microsoft Publisher.
- Some lighting consoles have graphical layout tools built in. ETC Eos even calls the feature a 'magic sheet'. I always recommend that you have a magic sheet on paper at the tech table, but if you like building the magic sheet in the console, you can always download a screenshot to print out.
- You can even do a nice magic sheet with pencil on a piece of graph paper.
