Each scenic design has different requirements, encumbrances, and opportunities for lighting. The architecture of the theatre space always influences the lighting design, and sometimes even dictates some of the choices that you make. Some of these physical parameters will be beneficial to the lighting design: a scenic piece with an interesting texture will look great when you skim an environmental light across it. Others may be obstacles to overcome: permanent front of house speakers are hanging right in line with where you usually like to place your front lights.
For the sake of clarity, I will discuss the analysis of these two elements (of the space and of the scenery) separately, but in reality they are really done simultaneously. There are moments that you will have an idea of how to light the scenery, but the theatre space puts something in your way. Other times, whole sections of the theatre infrastructure may be useless because of how the scenery is laid out. This part of the process is a constant back-and-forth in which you are looking for opportunities in both of those areas. However, you will often find that this step is primarily useful for the identification of limitations to your lighting design so that you can creatively discover solutions for those encumbrances.
For the sake of clarity, I will discuss the analysis of these two elements (of the space and of the scenery) separately, but in reality they are really done simultaneously. There are moments that you will have an idea of how to light the scenery, but the theatre space puts something in your way. Other times, whole sections of the theatre infrastructure may be useless because of how the scenery is laid out. This part of the process is a constant back-and-forth in which you are looking for opportunities in both of those areas. However, you will often find that this step is primarily useful for the identification of limitations to your lighting design so that you can creatively discover solutions for those encumbrances.
Analyzing the scenic design
The arrangement of space, and the sculptural aspects of the scenic design define most of what you'll be doing as a lighting designer. The layout of the space determines where actors will be on the stage, helping you to design your area light. The objects on the stage are both elements that give you opportunities to sculpt the space but also have a tendency to 'get in the way' of lighting fixtures - ask anyone who has been asked to light a set with a ceiling!
Defining acting areas
The primary acting areas may not be entirely clear until rehearsals start, but an experienced lighting designer can look at a scenic design and begin to guess how the space will be used. These guesses, alongside conversations with the director, allow the designer to make decisions about how the lighting design will approach where the actors will be before ever seeing a rehearsal.
When you are defining acting areas in a lighting design, you are essentially breaking up the space into zones of control. You need to break up the space into chunks, so that you're able to emphasize important areas of the stage, and back off the attention in areas that are less important. This speaks directly to the Focus function of stage lighting. You want to be able to direct the eye of the audience to focus their attention where it needs to be.
Different shows require different approaches to zones of control, even shows that have similar environments, and using the same stage space. Early on in the design process, you need to decide how large your typical acting area will be. You can break your space up into lots of small areas, which gives you maximum control over which areas of the stage will be lit, and which will be left dark, but this approach requires that you devote a large number of lighting fixtures to area light, potentially leaving few fixtures for environmental lighting. On the other hand, you might choose to make very large acting areas, which allows you less specific control over the space, but uses far fewer fixtures.
Different shows require different approaches to zones of control, even shows that have similar environments, and using the same stage space. Early on in the design process, you need to decide how large your typical acting area will be. You can break your space up into lots of small areas, which gives you maximum control over which areas of the stage will be lit, and which will be left dark, but this approach requires that you devote a large number of lighting fixtures to area light, potentially leaving few fixtures for environmental lighting. On the other hand, you might choose to make very large acting areas, which allows you less specific control over the space, but uses far fewer fixtures.
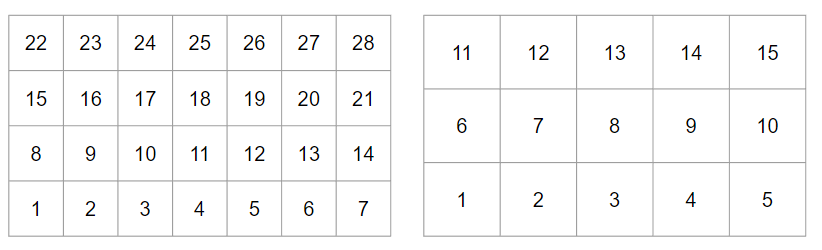
These two stages are the same size. The one on the left is broken up into a 7x4 grid of very small areas. This approach is good if you have lots of fixtures, and need to design with lots of tight isolation.
On the right, the 5x3 grid still allows some isolation, but the areas are larger and requires fewer fixtures.
If you are using 3-point lighting for each of your areas, the example on the left would require 84 fixtures, while the example on the right requires only 45.
Grid-based Acting Areas
The examples above are representative of grid-based area light. In this type of layout, you divide the space equally into squares. In this type of system, you almost always want to divide the Stage Left-Stage Right space into an odd number of columns, so that you have a center area. Directors and actors love using the center of the stage, and it's best if that spot is not divided between two areas.
You might also use grid-based systems when the scenery changes a lot. If there are lots of rolling wagons that reconfigure for every scene, setting the lighting up in a grid is often the most efficient approach.
- Start with the measurements of the stage space and divide it into rows and columns. For example, if your stage is 50 feet wide that breaks down into:
- three 16' areas - this is really big. I would only use 16' areas in a big broad play that was mostly a 'lights up/lights down' situation, or in a space that has a very limited number of dimmers. In most cases, you'll find that you need to use two fixtures to cover an area like this anyway.
- five 10' areas - an eight to twelve foot area of light usually seems to work pretty well, so this choice will be right a lot of the time. You have enough control to make specific choices, but the instrument count will stay pretty reasonable.
- seven 7' areas - in a play that you need a lot of isolation and fine control over the focus, this might also be appropriate.
- Divide the Downstage/Upstage distance similarly
- In many cases it is best to have a roughly square area of light- if it is 10' wide, then make your rows 10' deep as well.
- But you might also divide the stage space based on where the masking is, especially for dance. If you have four openings in the legs, you might choose to make your area light match these alleys.
- Some shows require more isolation in one direction than the other- you might have 7 areas wide, in order to get a lot of isolation left to right, but only need two alleys from downstage to upstage, because of the nature of the stage action.
- The rule of odd numbers doesn't apply as much when creating horizontal alleys. You do want to make sure that whatever spots on the stage that will be used as 'center' are in an area, but sometimes this is simply downstage center and upstage center, and a 2-alley grid system is appropriate.
You might also use grid-based systems when the scenery changes a lot. If there are lots of rolling wagons that reconfigure for every scene, setting the lighting up in a grid is often the most efficient approach.
Example
|
|
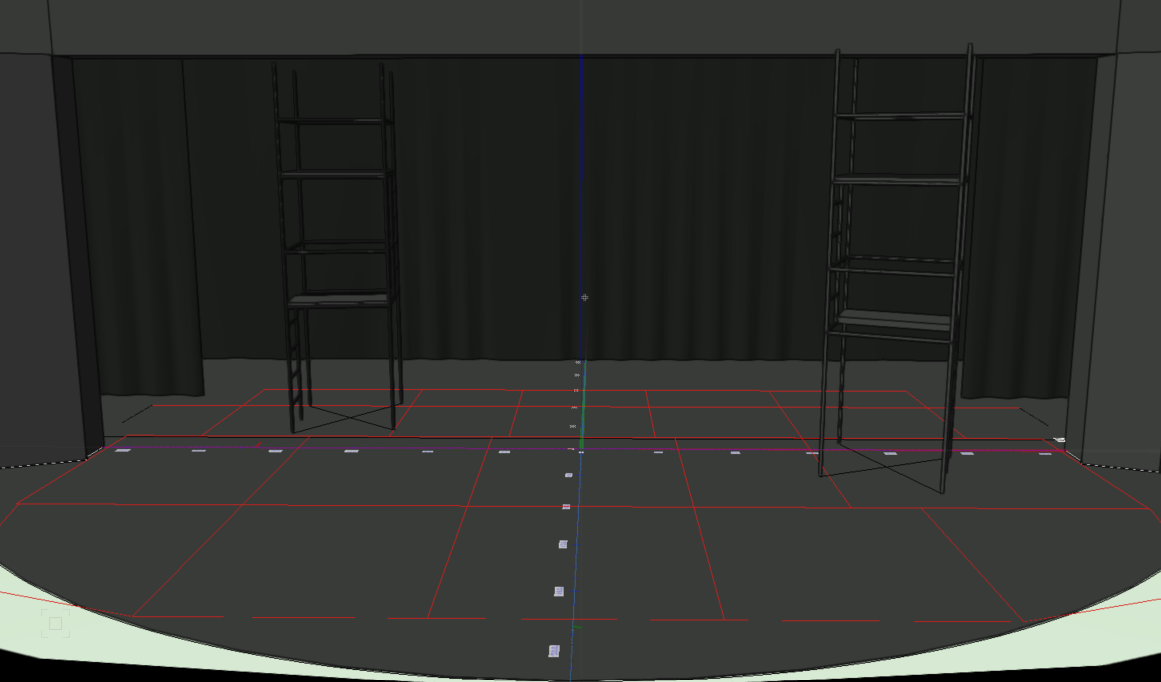
This set for Hamlet is mostly a very open stage. The only scenery present are these two scaffolding towers, and a scrim that came in and out at various points during the play.
When I broke up the space into areas, I mostly stuck to a grid pattern, but that grid was affected by where the scenery was set. The stage space was approximately 50' from left to right, so dividing into 5 gave me roughly 10' areas. I did want to make sure that each tower was entirely within an area, as they would be used as a space to isolate scenes, so I adjusted the size of the areas to make this happen. That led to some areas being slightly larger, and some slightly smaller. I also looked at how the space was likely to be used by actors, and decided that the area offstage of the two towers would not be places that I would probably need to isolate, so I combined those, leaving a 4-across breakup in both alley 2 and alley 3. But you notice that I still have a strong center area where I can isolate.
When I broke up the space into areas, I mostly stuck to a grid pattern, but that grid was affected by where the scenery was set. The stage space was approximately 50' from left to right, so dividing into 5 gave me roughly 10' areas. I did want to make sure that each tower was entirely within an area, as they would be used as a space to isolate scenes, so I adjusted the size of the areas to make this happen. That led to some areas being slightly larger, and some slightly smaller. I also looked at how the space was likely to be used by actors, and decided that the area offstage of the two towers would not be places that I would probably need to isolate, so I combined those, leaving a 4-across breakup in both alley 2 and alley 3. But you notice that I still have a strong center area where I can isolate.
Conversation-based areas
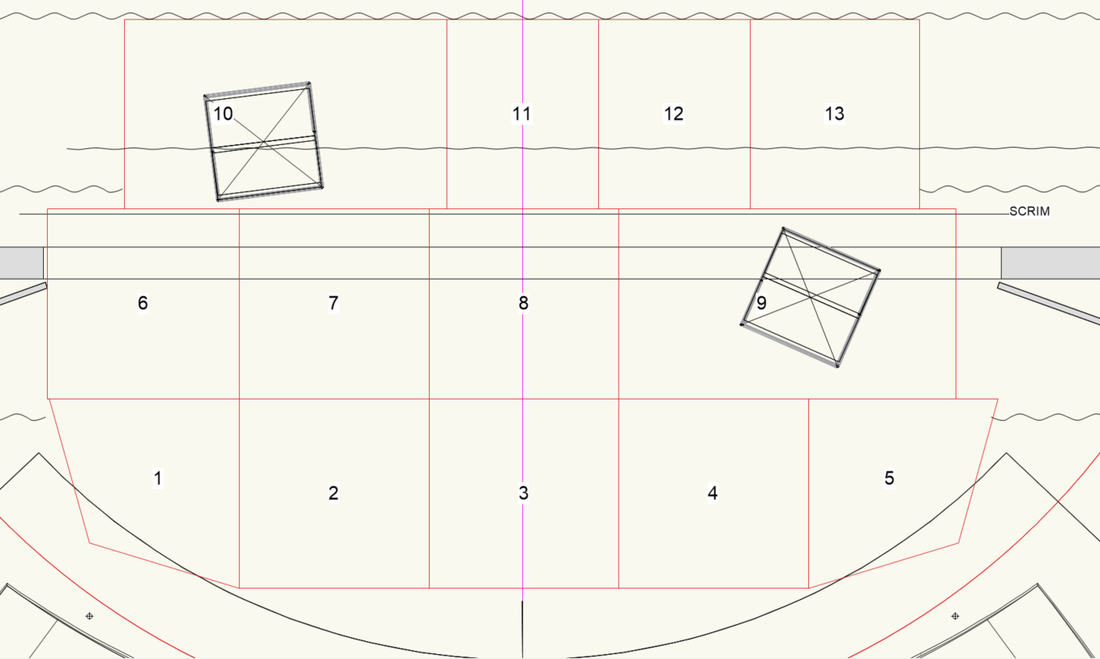
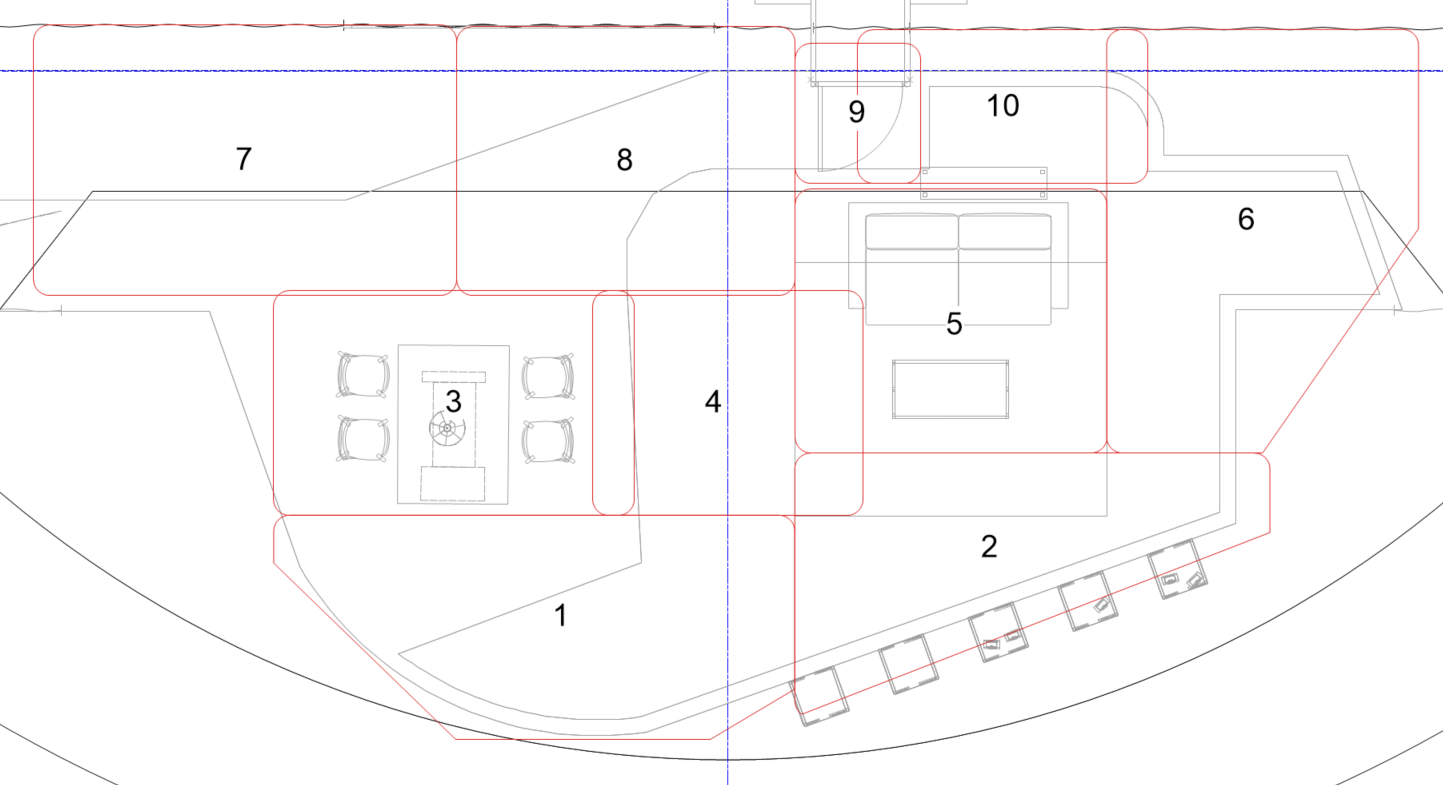
Many set designs don't lend themselves well to a grid-based approach. Even the very simple set above required some alterations to the strict grid setup based on the space itself. A realistic box-set interior is one example. In these cases, you usually have a series of what I call conversation areas - or places where conversations happen. When I'm faced with a set like this, I usually start by building a lighting area for each of these conversation places, and then fill in the gaps. This sometimes leads to a really strange layout, like this one for Goodnight, Tyler.
|
|
In this case, I started creating areas based on the places where I would most likely need to isolate actors on the stage: the kitchen island, and the sofa. These became area 3 and area 5 respectively. The next areas that I drew out were the door - a very small area 9, and 'behind the couch' (area 10) because I know that this is a place that directors will often stage an actor. You'll notice that area 9 and area 10 overlap slightly- I always want to be able to isolate or emphasize entrances- they are very often important for a reveal of a character, but I also want to be able to de-emphasize that here, because it is a bright white door against an otherwise dark background. The area behind the sofa needs to stretch to the whole sofa, so as a result the two areas overlap.
Once I had these areas- 3, 5, 9, 10, I started filling in the gaps. Area 4 becomes my important 'center stage' area between these two furniture groupings. Areas 6 and 7 are also entrances, SL and SR, and Areas 1, 2, and 8 give me coverage on the rest of the space.
In this play, there were a few moments that happened on the black painted floor, but these moments were outside of the reality of the rest of the setting, so I did not need to include these areas in the systems layout. Those moments could be treated individually with specials. There's more detail on what to do with all of these areas on the Systems and Specials page later in the process.
Analyzing the physical elements of the set
|
Lighting the actors is really important, but it is only part of the job. You also need to look at what the scenery offers you, and also what challenges it will put in your path. The variables here are infinite, but here are some things to look for:
OPPORTUNITIES:
|
|


|
CHALLENGES:
The first and most apparent challenge that the lighting designer faces is when scenery appears to be 'in the way' of lighting positions. This analysis happens in concert with the next section, as you're analyzing the theatre space and identifying where the hanging positions are. These scenic elements could be as obvious as a physical ceiling in the set, but other, less obvious objects could drive some of the choices as well.
|
|


Analyzing the architecture of a Proscenium Theatre
The first thing to realize as a lighting designer is that every theatre space is unique. Theatres of the same general type (in this section we'll discuss Proscenium theatres) have similarities, but every space has its nuances that affect the lighting design. One space might have hanging positions over the center of the audience, whereas the next space might only have box booms attached to the side walls of the auditorium. The front of the stage might extend no further downstage from the curtain line, or there might be a giant apron over an unused orchestra pit. You might not be able to put booms on one side of the stage or the other, because that is where the door to backstage is located. On the flip side, maybe the space was designed with lighting in mind, and there are removable troughs in the stage floor where you can hide footlights or a cyclorama ground row. While one proscenium space might have some linesets that are defined as the electrics, another might allow you to choose which battens on which to hang overhead lighting. Are you working with a fixed inventory of fixtures that is owned by the producing organization, or do you have a rental budget that allows you to choose your own fixtures (or some combination of those elements)? These are some of the variables that you'll be looking at throughout the process of analyzing the space.
Over Stage Positions
Electrics/Stage Battens
The Stage Electrics are the overstage pipe battens in a proscenium theatre on which lighting fixtures are hung. Some theatres have dedicated electrics with permanent (or semi-permanent) circuit raceways attached. These electrics are the same from show to show, and the scenery and masking are installed with these predetermined lighting positions already in place. In other venues, the electrics are more flexible, and the placement and number of lighting electrics is determined in conversation and cooperation with the scenic designer. In these venues, the electricians will run multi-cable from the grid or from the sides of the stage to the battens that are decided upon as electrics.
Ladder
Taildown
Grid
Front of House (FOH) Positions
Cove/Catwalk/Truss
There is usually at least one hanging position over the heads of the audience. In some cases, the theatre is built with lighting catwalks, either suspended from the roof of the theatre, or built into the ceiling of the space (cove). In other cases (and in most Broadway houses) a truss is suspended from chain motors from the roof of the theatre. These positions all serve to hang front lights to provide visibility for the stage.
Balcony Rail
Box Boom
On Stage positions
Pro Torm
Boom
Sidearm
Every theatre that you work in will likely have a unique way of naming the positions. Try to be consistent with the way that the venue typically names the positions- it makes the lighting install go much more smoothly. If there is a non-conventional lighting position, ask the Master Electrician in advance how you should notate the fixtures in order to make future conversations much easier.
Hanging Positions in a Non-Proscenium Theatre
While proscenium theatres are extremely varied in the design and availability of different hanging positions, they almost look like cookie-cutters when compared to the differences from one non-proscenium theatre to another. There are as many different layouts for arenas, thrusts, black boxes, and other non-proscenium spaces as there are innovative architects who create them! Though every space is very different from the next, here are a few thoughts about common features that you may find.
You will often find a pipe grid suspended from the ceiling or roof structure in these spaces. This often means that the designer has much more flexiblity in the placement of instruments, as the 'downstage/upstage' pipes give additional places to hang instruments. In theatres which employ pipe grids, it is very important to check with the Master Electrician so that the naming conventions that you use as a designer are the same as those that the venue are used to. Often one direction pipe is numbered from 1 to whatever, and the opposite direction uses letters.
These theatres may also have catwalks along the walls of the theatre with additional hanging positions.
