
One of the most common questions that beginning lighting designers have is "How do I decide which fixture to use?". You know your equipment, and you know what the fixtures do, but understanding when to hang a 19° or a 50° is probably still a little fuzzy at this point. Each fixture has Photometric Properties (photometric literally refers to 'measuring light') that can tell you mathematically how large and how bright a pool of light will be when sent from a specific fixture over a specific distance.
Each fixture manufacturer publishes a datasheet that gives you the information that you need to figure out the answer to these questions. Here's an example:
Just for fun, this example is for a conventional, lamp=based fixture that is mostly obsolete (though the chances of coming across the Altman 360Q in an inventory is much higher than 0%). I'll chat a little about the difference with LED fixtures in a bit, but for the moment, we'll start with fixtures that use halogen lamps. Even newer fixtures use these charts as a basis, so once you understand how to read this, you'll be ready to interpret photometric data for lots of fixtures, both ancient and modern.
This not-to-scale drawing gives you information about both the brightness and the size of the beam at various distances. Across the bottom, the numbers (10, 20, 30, etc.) refer to the throw distance, or the distance in feet between where the fixture is hung and where the beam of light lands (usually on the stage). The number in the middle (4, 7, 10) gives you an estimate of the size of the beam of light at each of these distances. So if you hang this fixture 30' away from the stage, the field (or pool) of light from edge to edge will be approximately 10' wide. The numbers across the top of the chart are an approximate measure of the luminance measured in footcandles. In modern fixtures, you'll also commonly see the luminance measured in lux. Most modern fixtures are quite a bit brighter than this example, but in the old days we used to use around 100fc as a reference point to tell us that the light would be 'bright enough' on the stage. For this fixture, once you get to 50 feet of throw distance, while the pool of light is very large (17 feet in diameter) the luminance falls under that 100fc threshold, and would probably require a second fixture. Fixtures are bright enough now that the luminance measure is mostly used to compare fixtures, rather than assuring that the light is bright enough.

The 6x16* fixture pictured above is a fixture with a relatively narrow beamspread. This chart is from the 6x9* version of the fixture. This fixture is built with lenses arranged so that the beamspread is much wider. Compare the variables between the two charts and you should be able to easily tell the different effects the two fixtures will have on stage.
We determined earlier that a 6x16 hung 30' away from its subject would cast a field of light about 14' in diameter. We can also tell from the chart above that the luminance would be approximately 258fc. If we hang a 6x9 right next to that 6x16 and focus it to the same point on the stage, with an identical 30' throw distance, the field of light would be 20' in diameter, and the luminance would drop to 97fc- less than half as bright as the 6x16, using the same type of lamp!
So we return now to the question posed at the beginning of this page: How do we know which fixture to hang? By using the photometric data associated with the fixtures in our inventory, and comparing that to the needs of each of the lighting areas in the lighting design, we can assure that we choose the most efficient fixture for each area. We are looking for a fixture that will cover the focus area, with maximum brightness and minimum need to shutter (waste) light on the edges.
*6x16 and 6x9 follow the naming conventions of many fixtures manufactured before about 1990 or so. The numbers in these names refer to measurements inside the instruments themselves. The first number (6 in both of these cases) refers to the diameter of the lens. The second number refers to the focal length of the elliptical shape of the reflector. The focal length of the first fixture (16") is much longer than that of the second fixture (9"), and results in a narrower beam of light. Modern fixtures have gone away from this naming convention, favoring the more straightforward convention of using the beamspread of the field angle. A 6x16 is roughly equivalent to a 19° fixture, and a 6x9 to a 36°)
Field Angle and Beam Angle

One more nuance to halogen lamp-based fixtures is that most of these fixtures have a discernable 'hot-spot' in the center of the beam, and the level of luminance tends to fall off quickly as you move towards the edge of the field. This is a characteristic that has lessened significantly, especially as the industry moves towards using LED fixtures, but it is worth spending some time with, especially because many inventories continue to employ lots of incandescent fixtures.
Beam Angle: This is a measure of the 'brightest' part of the field of light. This is measured using a light meter to determine the brightest luminance of the pool of light, usually right in the center. Once the brightest luminance is defined, the meter moves towards the edge of the field, and when the luminance reading reaches 50% of the maximum, that is considered the edge of the beam angle.
Field Angle: This is the largest measurable angle of light that exits the lens of the fixture. On the charts in the previous section, the field diameter measures the size of the pool of the light from edge to edge. In modern fixtures, the name of the fixture (19°, 50°, etc.) refers to an approximate measure of the field angle. The edge of the Field is the point at which the luminance falls off to 10% of the brightest point in the pool of light.
In general, when using incandescent fixtures, you want to make sure that you're using the Beam Angle to cover your focus areas. The Field part of the light beam tend to overlap with adjacent lights in the system, giving you an even wash of light. Usually, when you see a dark spot on stage, it's only that the actor is standing in a spot on the stage that is mostly covered in the area of the pool that is between the edge of the beam and the edge of the field. The light here is only 50% of the brightest intensity, and the difference is very noticeable!
LED nuances
 A typical halogen lamp field (left) vs the flat field of an LED (right) - artistic rendering
One of the biggest changes that old-school lighting designers (like me) have had to make with the changeover to predominantly LED fixtures in the last few years is in photometric calculations. Most LED fixtures have a much flatter field of light, meaning that the hotspot is much less apparent, due to a much more gradual dropoff in luminescence as compared to halogen lamp-based fixtures. In these cases, the difference between field angle and beam angle is much less pronounced, and you can count on more of the field angle as being useful light. Through my history of using lamp-based fixtures, I've gotten used to the idea that a 36° fixture really has about 26° of useful light, but an LED 36 ° fixture has much closer to 36° of useful light (depending on the level of softening of the edge).
For example, the 36° Source 4 LED with a high definition lens has a Field Angle of 34.8°, and a Beam Angle of 33°. The halogen version of the Source 4 36° fixture has a Field Angle of 34°, but a Beam Angle of only 27°. That becomes a very big difference over a throw distance of 20 or 30'.
For example, the 36° Source 4 LED with a high definition lens has a Field Angle of 34.8°, and a Beam Angle of 33°. The halogen version of the Source 4 36° fixture has a Field Angle of 34°, but a Beam Angle of only 27°. That becomes a very big difference over a throw distance of 20 or 30'.
Placing Fixtures

So what does all this mean to the lighting designer when creating a plot? This information will allow you to place fixtures in your rig so that the result on stage will be predictable. If you don't do a careful photometric analysis while you're planning your plot, it could cost you a lot of time making changes in the space. It's not uncommon to swap out a lens tube or two during a focus, or to slide a fixture down the pipe if it's not doing what you need it to, but you'll be doing a whole lot more of that if you make a lot of guesses in the plotting process.
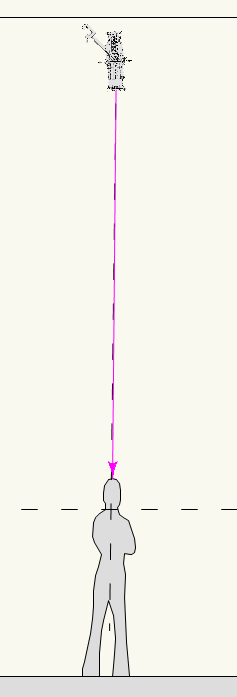
When placing fixtures, you are primarily interested in two points: Where the light hangs, and where the light is focused. To figure out where to place fixtures on the plot, we want to look at a cross section of the light. This diagram shows how we lay this out. I always want to start with a person, especially for area light, because we need to make sure we're lighting the face, not the floor. We strike a line up from an imaginary horizontal from the actor's face, at the approach angle that we want to come in. If it's a front light, that angle might be 45°, as it is in this drawing. The place where that line intersects with a hanging position determines both the throw distance and the plot distance. You'll notice that this creates a triangle. The Hypotenuse of the triangle is the throw distance, and will be important to know when you're trying to decide which fixture to choose. The horizontal leg of the triangle becomes the Plot Distance, which is important when you're placing the fixture on the light plot. On the next page, we will go through the placement of a couple fixtures so you can see how these calculations work.
Note that the plot distance line can be any direction. In the example above, if we imagine this to be a front view, then we are plotting a side light. If, on the other hand, it is a side view, we are plotting a front or back light. Essentially, once you have a plot distance, you create a circle centered on the focus point, with a radius equal to the plot distance, and anywhere the circle intersects with a hanging position (at the correct trim height), you can hang a light and expect the same approach angle. Go on to the next page in this tutorial to see how this works in practice.

Notice when the angle of the light is steeper (this one is 60° off of horizontal), the plot distance becomes shorter
|
The Plot Distance for a top light is 0 (or close to it)
|

Using the section view is a really important step that a lot of lighting designers sometimes skip (beginners and veterans alike). We sometimes rush the design, and 'guess' the approach angle by placing a lighting fixture on the plan view of the plot without working in the section view. Here's an illustration of why that is: Here are two different battens, one with a 13' trim height, and one with a 25' trim height. The Plot Distance for each fixture is the same, but look at the difference in Approach Angle when we look at it in section:
To further illustrate this dilemma, is the fact that if you measure out the beam angle required for each of these fixtures, you may find that you would use the same fixture in both instances. To get an 8' pool of light, the beam angle from 25' measures 17°, and the one from 13' measures 18°, perhaps leading me to a 26° fixture in both instances (though I probably would cheat out the 13' fixture to a 36° anyway, but that's a different lesson...) |

|
Which fixture do I need?

Once you have determined where the fixture lives on the plot, you can choose which beam angle is appropriate through much the same process. To do this, first you look at how large the focus area is. You made this determination as you were creating systems and specials. In the example shown here, the focus area is 10'. I've drawn a box 10' wide (the size of the area) and 6' high (because we're lighting faces, so we need to pay attention to the top of the box, rather than the bottom). Then I simply draw two lines from the top corners of this imaginary box that converge at the fixture. When I measure this angle with a protractor, I see it is 22°. Referring to the beam angles for my available fixtures, I find that the most appropriate fixture is a 36° fixture (remember- the name of the fixture refers to the field angle, rather than the beam angle- we want the brightest part of the field to cover the whole focus area). The field angle is denoted in this example as a dashed line, and will either be shuttered off, or used as overlap into the next area.
